How to Do an Intramuscular Peptide Injection
Feeling unsure about your first intramuscular peptide injection? This simple how-to covers the correct technique, a full supply list, and the best injection sites.

This content is for informational purposes only and does not constitute medical advice. Always consult with a qualified healthcare provider before starting or changing any treatment plan.
If your provider has prescribed peptide therapy, you might be looking at a small vial and wondering about the next step. While many peptides are injected into the fatty layer just under the skin, some protocols call for an intramuscular peptide injection. This method delivers the peptide directly into a muscle, which can change how your body absorbs it. The idea of giving yourself a shot can be nerve-wracking, but learning the proper technique is straightforward and key to a safe and effective treatment.
This guide will walk you through the entire process, from gathering your supplies to choosing a site and administering the injection correctly.
Not Sure Where to Start with Peptide Therapy?
Finding the right treatment and a trustworthy provider is the most important first step. If you're exploring your options, our free quiz can help. It takes less than three minutes and matches you with a qualified provider in your area.
Take our free quiz to get matched with a provider today.
What You'll Need for Your Injection
Before you begin, organization is your best friend. Having everything you need laid out and ready will make the process smooth and stress-free. Your provider or pharmacy should supply most of these items, but it's good to know what they are.
Here’s a checklist of the typical supplies for an intramuscular injection:
- Peptide Vial: The medication itself, either in a liquid form or as a powder (lyophilized) that needs to be mixed.
- Bacteriostatic Water: If your peptide is in powder form, you'll need this sterile water to reconstitute it.
- Syringes: You may need two types. A smaller insulin syringe (e.g., 29-31 gauge) is often used for mixing and drawing a precise dose, while a slightly larger syringe with a longer needle (e.g., 22-25 gauge, 1 to 1.5 inches long) is needed for the actual intramuscular injection (Source: PeptidesExplorer). Your provider will specify the correct sizes for you.
- Alcohol Prep Pads: Used to sterilize the top of the peptide vial and your skin at the injection site.
- Sterile Gauze or Cotton Ball: For applying light pressure to the site after the injection.
- Adhesive Bandage: To cover the injection site afterward.
- A Sharps Container: A puncture-proof container specifically designed for safely disposing of used needles and syringes. Never throw them in the regular trash.
Always inspect your supplies. Check expiration dates on the peptide, bacteriostatic water, and needles. Ensure all packaging is sealed and sterile.
Before You Start: IM vs. Subcutaneous Injections
Most injectable peptides, especially popular ones for weight management like Wegovy and Zepbound, are administered subcutaneously. This means they're injected into the fat layer right beneath the skin. As of 2026, about 65% of all FDA-approved peptide drugs use this route (Source: Peptides Academy). So why would you need to perform an intramuscular peptide injection instead?
The main difference is absorption speed. Muscle tissue has a richer blood supply than fat. Injecting a peptide into the muscle allows it to enter the bloodstream much faster. Peak plasma levels can be reached in 15-30 minutes with an IM injection, compared to 45-60 minutes for a subcutaneous one (Source: PeptidesExplorer).
Your provider will prescribe an IM injection for a few specific reasons:
- The Peptide Requires It: Some peptides are known to be more effective or cause less irritation when administered into the muscle. For instance, protocols for peptides like TB-500 or certain growth hormone-releasing peptides sometimes specify IM use (Source: PeptidesRx).
- The Volume is Large: Subcutaneous tissue can only comfortably hold a small amount of liquid, typically 1 mL or less. If your dose is larger than that, an IM injection into a larger muscle like the thigh or hip can accommodate it (up to 3 mL) (Source: CalcMyPeptide).
- Faster Action is Desired: For peptides where a rapid onset is beneficial, the faster absorption of an IM injection is the primary goal.
It’s crucial to understand that you should never switch from subcutaneous to intramuscular administration (or vice versa) without explicit instructions from your doctor. They are not interchangeable. For a deeper dive into the different injection spots for both methods, check out our guide on where to inject peptides.

How to Give Yourself an Intramuscular Peptide Injection: 6 Steps
Once you've confirmed the method with your provider and gathered your supplies, you're ready to go. Follow these steps carefully for a safe and effective injection.
Step 1: Prepare Your Workspace and Reconstitute the Peptide (If Needed)
First, wash your hands thoroughly with soap and water. Clean your workspace with an antibacterial wipe.
If your peptide came as a powder, it needs to be reconstituted. This means mixing it with bacteriostatic water.
- Use an alcohol pad to wipe the rubber stoppers on both the peptide vial and the bacteriostatic water vial.
- Your provider will tell you exactly how much water to add. Use a syringe to draw that amount of water.
- Gently inject the water into the peptide vial, aiming the stream of water against the side of the glass vial, not directly onto the powder.
- Do NOT shake the vial. This can damage the fragile peptide molecules. Instead, gently roll the vial between your hands or swirl it until the powder is completely dissolved.
If you’re unsure about the mixing ratio, our free peptide reconstitution calculator can help you get the math right.
Step 2: Choose and Prepare Your Injection Site
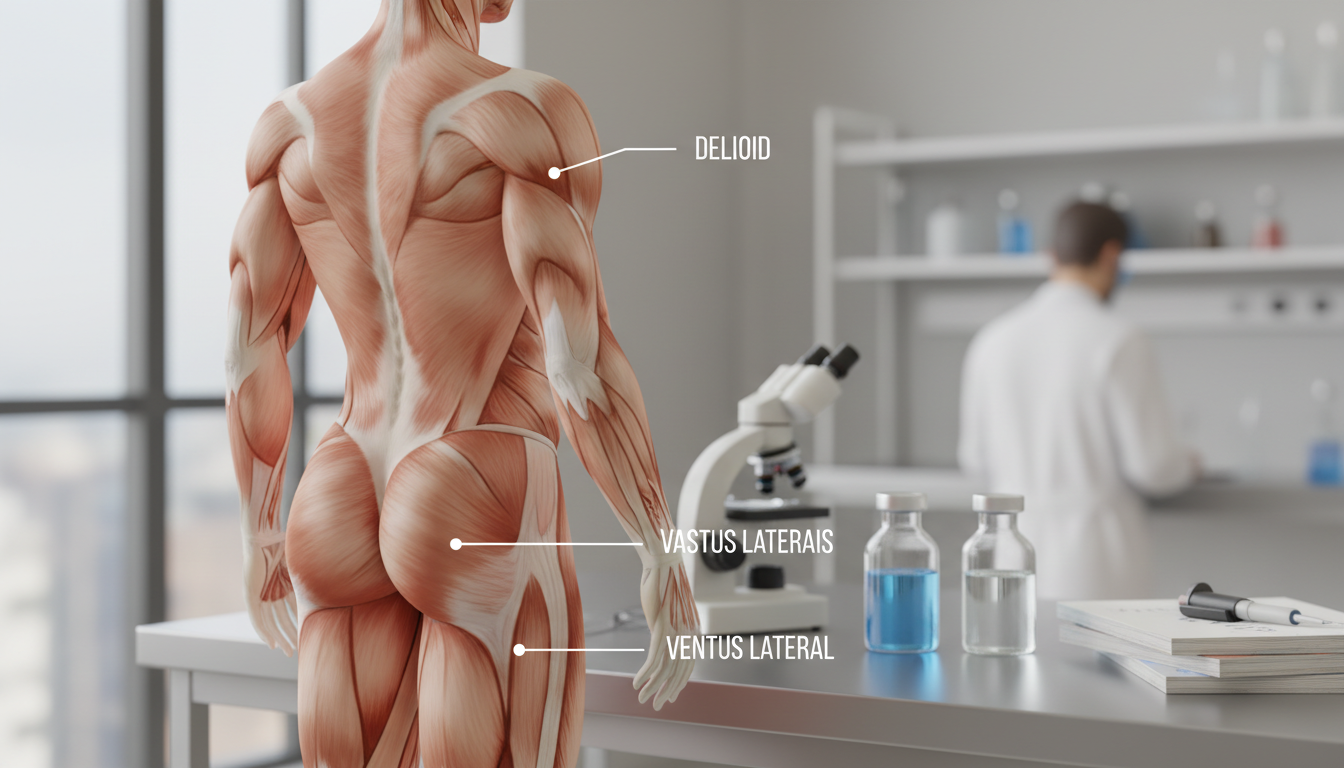
The most common and accessible sites for a self-administered intramuscular peptide injection are the thigh and the shoulder. The hip is also an excellent site but can be harder to reach on your own.
- Vastus Lateralis (Thigh): This is often the easiest site for self-injection. To find it, imagine dividing your thigh into three equal sections from your knee to your hip. The injection site is in the outer middle third. It’s a large muscle with no major nerves or blood vessels to worry about.
- Deltoid (Shoulder): This is the muscle on the upper part of your arm. To find the spot, feel for the bony point at the top of your shoulder (the acromion process). The injection site is about two finger-widths below this bone, in the center of the upside-down triangle shape of the muscle. The deltoid is a smaller muscle, so it's typically used for smaller injection volumes (1 mL or less) (Source: CalcMyPeptide).
- Ventrogluteal (Hip): This is considered one of the safest IM sites, but it's tricky to find and reach. It's located on the side of your hip. Because it's difficult for self-injection, most people stick with the thigh or deltoid. Ask your provider for a demonstration if they recommend this site.
Once you’ve chosen a site, clean the skin thoroughly with a new alcohol prep pad. Let it air dry completely. Do not fan or blow on it, as this can introduce germs.
Step 3: Draw Your Prescribed Dose
Now it's time to draw the peptide solution into your injection syringe.
- Use a fresh alcohol pad to wipe the rubber stopper of your peptide vial one more time.
- Take your injection syringe and pull the plunger back to the mark for your prescribed dose. This fills the syringe with air.
- Insert the needle through the rubber stopper of the peptide vial and push the plunger down, injecting the air into the vial. This equalizes the pressure and makes it much easier to draw the liquid out.
- With the needle still in the vial, turn the vial upside down. Pull the plunger back slowly to draw out the correct amount of medication.
- Check the syringe for any large air bubbles. If you see any, gently tap the side of the syringe to make them rise to the top, then push the plunger slightly to expel the air.
Step 4: Administer the Intramuscular Peptide Injection
This is the moment of truth. Take a deep breath; you've got this.
- Hold the syringe like a dart with your dominant hand.
- With your other hand, gently stretch the skin taut at the cleaned injection site.
- In one quick, smooth motion, insert the needle into the muscle at a 90-degree angle. The needle should go all the way in to ensure it reaches the muscle tissue. The required needle length is typically 1 to 1.5 inches (Source: Peptide Dossier).
- Once the needle is in, release the skin.
- Slowly and steadily push the plunger all the way down to inject the medication. Injecting slowly helps minimize discomfort.
Some older guidelines recommended "aspirating" (pulling back the plunger slightly to check for blood). However, this practice is generally no longer recommended for IM injections in the deltoid or vastus lateralis, as the risk of hitting a major blood vessel is extremely low with proper site selection (Source: PeptidesRx). Always follow the specific instructions given to you by your healthcare provider.
Step 5: Withdraw the Needle
After injecting all the medication, wait a few seconds before withdrawing the needle. This allows the medication to begin dispersing into the muscle.
- Pull the needle straight out at the same 90-degree angle you inserted it.
- Immediately place the used syringe and needle into your sharps container. Never recap the needle.
Step 6: Aftercare for the Injection Site
Once the needle is out and safely disposed of, use a sterile gauze pad or cotton ball to apply gentle pressure to the site for a few seconds. You might see a tiny drop of blood, which is normal.
- Do not rub or massage the injection area.
- You can apply an adhesive bandage if you like.
- Monitor the site over the next day for any signs of a reaction beyond mild soreness.
That's it! You've successfully completed your injection. Remember to rotate your injection sites with each dose to prevent skin irritation and tissue buildup.
Want to See Which Peptides Fit Your Goals?
Every individual's health needs are unique, and so are peptide protocols. If you're curious about whether peptide therapy can help with your wellness goals, from weight management to tissue repair, expert guidance is key.
Our 3-minute quiz matches you with vetted providers who can create a plan for you.
Common Mistakes to Avoid with an Intramuscular Peptide Injection
Perfecting your technique takes practice. Being aware of common pitfalls can help you avoid them from the start.
- Reusing Needles or Syringes: This is a major safety risk. Needles are single-use only. Reusing them can cause infection, skin damage, and pain, as the tip becomes dull after just one use.
- Injecting Too Quickly: Pushing the plunger too fast can cause unnecessary pain and tissue damage. A slow, steady injection over about 10 seconds is much more comfortable.
- Shaking the Vial: Peptides are delicate protein chains. Shaking a vial after reconstitution can break them apart, rendering the medication ineffective. Always swirl or roll gently.
- Using the Wrong Needle Length: A needle that's too short won't reach the muscle, resulting in a subcutaneous injection. A needle that's too long could hit bone. Use the size your provider prescribed for the specific injection site.
- Forgetting to Rotate Sites: Consistently injecting in the exact same spot can lead to lipohypertrophy, a buildup of fatty tissue, or scarring that can interfere with absorption. Keep a simple log to track your sites.
- Poor Sterile Technique: Forgetting to wash your hands or failing to clean the vial top and injection site with alcohol can introduce bacteria and lead to a serious infection.
When to Contact Your Doctor
While mild soreness, redness, or a small amount of itching at the injection site is common and usually resolves within a day, certain symptoms warrant a call to your doctor.
Contact your healthcare provider if you experience any of the following:
- Signs of Infection: Increasing pain, swelling, warmth, or redness at the site, or any discharge or pus.
- A Hard, Painful Lump: A small lump can sometimes form, but if it’s very painful or doesn’t go away after a few days, have it checked.
- Severe or Shooting Pain During Injection: This could indicate you've hit a nerve.
- Symptoms of an Allergic Reaction: This can include hives, a rash, swelling of the face or throat, or difficulty breathing. This is a medical emergency, and you should seek immediate help.
- Fever or Flu-like Symptoms: If you develop a fever or feel unwell after an injection, let your doctor know.
Your health and safety are the top priorities. Never hesitate to reach out to your provider with any questions or concerns. Finding a good provider is essential, and you can learn more in our guide on how to find trustworthy peptide doctors.
Ready to Take the Next Step?
Learning how to administer your medication is just one part of the process. The most critical part is having a solid plan designed by a medical professional who understands your health goals. Whether you’re interested in peptides for weight loss, tissue repair like BPC-157, or anti-aging, the right guidance makes all the difference.
Take our free 3-minute quiz to get matched with a licensed provider who can help you explore your options safely and effectively.
FAQs
Is an intramuscular peptide injection painful?
An intramuscular injection is generally more noticeable than a subcutaneous one because the needle goes deeper into muscle tissue (Source: Peptide Dossier). However, most people describe it as a brief pinch or moderate ache that lasts only a few seconds. Using a fresh, sharp needle and injecting the medication slowly can minimize discomfort.
How do I know if I'm in the muscle?
Using the correct needle length (typically 1 to 1.5 inches for an adult) and inserting it at a 90-degree angle are the best ways to ensure you reach the muscle. Following the landmarking techniques for the thigh or deltoid muscles helps you aim for the thickest part of the muscle, away from bone.
Can I do an IM injection in my glute?
The large gluteal muscle (dorsogluteal site) is no longer recommended for self-injection because of the risk of hitting the sciatic nerve. A safer alternative is the ventrogluteal site on the hip, but it is more difficult to locate and reach on your own. For self-administration, the vastus lateralis (thigh) is the most recommended site.
What's the difference between an IM and a subcutaneous injection?
The main differences are depth and absorption speed. An intramuscular (IM) injection delivers medication deep into muscle tissue for faster absorption into the bloodstream. A subcutaneous (SubQ) injection delivers medication into the fatty layer just under the skin for slower, more sustained absorption.
How long should the needle be for an intramuscular peptide injection?
For an adult of average size, a 1-inch or 1.5-inch needle is standard for an IM injection into the deltoid or thigh (Source: CalcMyPeptide). Your provider will recommend the exact length and gauge based on the injection site and your body composition.
Contributing to evidence-based peptide education and provider transparency.
Too many clinics, not enough clarity?
We don't sell peptides. Tell us your goals and we'll connect you with a vetted provider who can figure out what actually makes sense for you.
See what's right for youRelated articles
How Protein and Muscle Growth Actually Work
It's not just about eating more. Understand the real science of protein and muscle growth to learn how much you need and the best timing to see results.
Peptide ScienceWhat are the best peptides for muscle growth and fat loss?
Exploring peptides for muscle growth and fat loss? Discover the most effective options for body recomposition, how they actually work, and what to expect.
Peptide ScienceThe Key L-Lysine Benefits for Skin, Immunity & Stress
Discover the science-backed l-lysine benefits. Our guide covers how this essential amino acid may boost collagen, fight viruses, and aid calcium absorption.