Peptide Injections Where to Inject: Best Spots & Tips
Our guide to peptide injections where to inject covers the best sites for comfort and success. See step-by-step photos for belly, thigh, and glute injections.

This content is for informational purposes only and does not constitute medical advice. Always consult with a qualified healthcare provider before starting any new treatment.
Learning how to administer your own medication can feel daunting. If you've been prescribed peptide therapy, you might be asking: peptide injections where to inject? This is the most common question, and getting it right is key to your treatment's success and your comfort. The good news is that for most peptides, the process is simple, safe, and nearly painless once you learn the proper technique.
As of 2026, over 80 peptide drugs have gained FDA approval, with many more available through compounding pharmacies thanks to recent regulatory updates (Peptides Academy). The vast majority, about 65%, are designed for subcutaneous injection into the fatty tissue just beneath the skin. This guide will walk you through everything you need to know, from gathering your supplies to performing the injection safely.
What You’ll Need
Before you begin, it’s essential to have all your supplies organized and ready. This prevents contamination and makes the process smooth. Here is a checklist of items your provider or pharmacy should supply you with:
- Peptide Vial: The medication itself, which may be in a liquid or a powder (lyophilized) form.
- Bacteriostatic Water: If your peptide is in powder form, you'll need this sterile water to reconstitute it.
- Insulin Syringes: These are the most common tool for peptide injections. They are small and have a very thin, short needle. Look for sizes with a 28-31 gauge and a 5/16" to 1/2" needle length, which are ideal for comfortable subcutaneous injections (PeptidesRx, CalcMyPeptide).
- Alcohol Prep Pads: Used to sterilize the top of the medication vial and the injection site on your skin.
- Sharps Container: An FDA-cleared container for safely disposing of used needles and syringes. Never throw them in the regular trash.
Keep all your supplies in a clean, dedicated space away from children and pets.
Before You Start: Important Context
Before your first injection, it's crucial to understand the "why" behind the instructions. Peptides are powerful molecules, and proper administration ensures you get the full benefit while minimizing risks.
Most peptides prescribed for systemic effects, like semaglutide for weight loss or CJC-1295/Ipamorelin for anti-aging, are administered subcutaneously. This means the injection goes into the fatty layer of tissue (the hypodermis) just below the skin, not deep into the muscle (Peptidings). This method allows for slow, sustained absorption of the medication, which is ideal for how most peptides work. According to PeptidesExplorer, this route offers high bioavailability of 90-100% with minimal pain.
Some peptides, like BPC-157, may offer enhanced benefits when injected locally, closer to a site of injury. While no published studies have confirmed this, some practitioners believe local injection creates a much higher concentration of the peptide where it's needed most (PeptideFox). Always follow the specific instructions from your prescribing doctor, as they will determine the best site based on your specific treatment goals. For a deeper dive, read our post on what the research says about BPC-157.
Finding the right guidance is the most important first step. If you haven't been connected with a provider yet, finding a trustworthy one is critical.
Unsure which peptide therapy is right for you or where to start? Take our free 3-minute quiz to get matched with a vetted provider who can create a plan for your specific needs.

Peptide Injections Where to Inject: A Step-by-Step Guide
Following a consistent, sterile routine is the key to safe and effective self-injection. Here’s how to do it, step by step.
Step 1: Prepare Your Workspace and Wash Your Hands
First, clean the surface where you will be preparing your injection. Then, wash your hands thoroughly with soap and water for at least 20 seconds. This is the single most important step in preventing infection. Dry your hands with a clean paper towel.
Lay out all your supplies on the clean surface: your peptide vial, a new sterile syringe, two alcohol pads, and your sharps container.
Pro Tip: If your peptide has been stored in the refrigerator, let the vial sit at room temperature for about 10-15 minutes before you inject. This can make the injection more comfortable, as injecting cold liquid can sometimes cause a slight stinging sensation (Peptide Dossier). Do not try to heat the vial in the microwave or hot water, as this can destroy the delicate peptide molecules.
Step 2: Reconstitute Your Peptide (If Necessary)
Many peptides, especially those from compounding pharmacies, come as a lyophilized (freeze-dried) powder. You will need to "reconstitute" them by adding bacteriostatic water.
First, pop the plastic cap off the peptide vial and the bacteriostatic water vial. Use an alcohol pad to wipe the rubber stoppers on top of both vials. Take a new syringe and draw the specified amount of bacteriostatic water as directed by your provider. Then, slowly and carefully inject the water into the peptide vial, angling the needle so the water runs down the side of the glass instead of spraying directly onto the powder.
Crucial Tip: Do not shake the vial! Shaking can damage the peptide chains. Instead, gently swirl or roll the vial between your hands until the powder is completely dissolved. The solution should be clear. If you need help calculating the right amount of water, you can use our free peptide reconstitution calculator. Reconstituted peptides are typically stable for 30-60 days when stored in the refrigerator (PeptidesRx).
Step 3: Choose and Clean Your Injection Site
This is the core question: peptide injections where to inject? For most subcutaneous peptides, you have a few good options. The most common and recommended site is the abdomen.
The abdomen provides a large surface area with a consistent layer of fatty tissue, leading to reliable absorption (Peptide Nerds). The ideal spot is the "Golden Zone," which is any area at least two inches away from your navel (CalcMyPeptide). Avoid injecting directly next to your belly button, or into any scars, moles, or bruises.
Other excellent subcutaneous injection sites include:
- The front or outer thighs: Pinch a fold of skin and fat.
- The back of the upper arms: This can be tricky to do on your own, so you may need assistance.
- The flanks or "love handles": The fatty area on your sides above your hips.
Once you’ve chosen a spot, clean it thoroughly with a fresh alcohol pad. Wipe in a circular motion, moving from the center outward, and let the area air dry completely. Do not fan or blow on it, as this can reintroduce germs.
Step 4: Draw the Correct Dose into the Syringe
Take a new, sterile insulin syringe from its packaging. Vigorously wipe the rubber stopper of your peptide vial with an alcohol pad. Pull back the syringe plunger to draw in an amount of air equal to your prescribed dose.
Insert the needle through the center of the rubber stopper and push the air from the syringe into the vial. This equalizes the pressure and makes it easier to draw the liquid out. Turn the vial and syringe upside down. Keep the needle tip below the surface of the liquid and pull the plunger back slowly to draw your exact dose.
Check for any large air bubbles in the syringe. If you see any, gently tap the side of the syringe to make them rise to the top. Then, slowly push the plunger just enough to eject the air, not the medication. A few tiny champagne-like bubbles are generally not a concern. Removing all air is critical for an accurate dose and a comfortable injection (Peptidings).
Step 5: Perform the Subcutaneous Injection
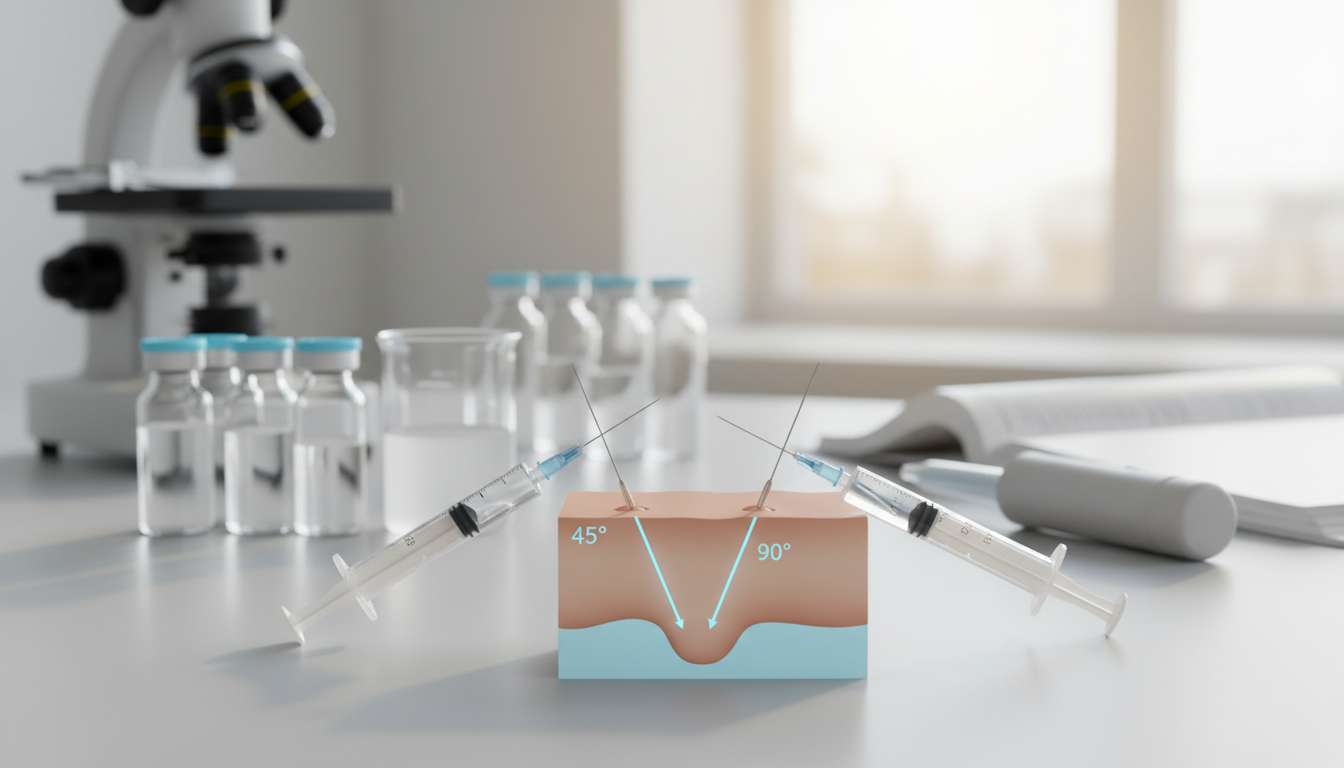
You've chosen your site, cleaned it, and prepared your dose. Now it's time to inject. With your non-dominant hand, gently pinch a one- to two-inch fold of skin and fat at the cleaned injection site. This helps lift the fatty tissue away from the muscle underneath.
Hold the syringe like a dart with your dominant hand. Insert the needle quickly and confidently into the pinched skin at a 90-degree angle. If you have very little body fat, your provider may advise a 45-degree angle to ensure you stay in the fatty layer (PeptidesExplorer).
Once the needle is fully inserted, release the pinch of skin to avoid injecting into compressed tissue. Slowly push the plunger down to inject the medication over 5-10 seconds. Injecting slowly can significantly reduce any discomfort (Peptide Dossier). Wait a moment before withdrawing the needle. Pull the needle out at the same angle it went in.
Want to see which peptide options fit your unique goals and health profile? Our free quiz takes less than three minutes and matches you with licensed telehealth providers who can help.
Step 6: Safely Dispose of the Needle
Immediately after withdrawing the needle, place it directly into your FDA-cleared sharps container. Do not bend, break, or attempt to recap the needle. Re-capping is a common cause of accidental needlesticks.
If a small drop of blood appears at the injection site, you can gently press a clean cotton ball or gauze on it. Do not rub the area, as this can affect absorption and cause bruising. A tiny bit of bleeding or bruising is normal, but if it's excessive, check with your provider. Exploring the potential pros and cons of peptide injections can help you set realistic expectations.
Peptide Injections Where to Inject: Common Mistakes to Avoid
Knowing peptide injections where to inject is half the battle. Avoiding these common mistakes will ensure your therapy is as effective and safe as possible.
-
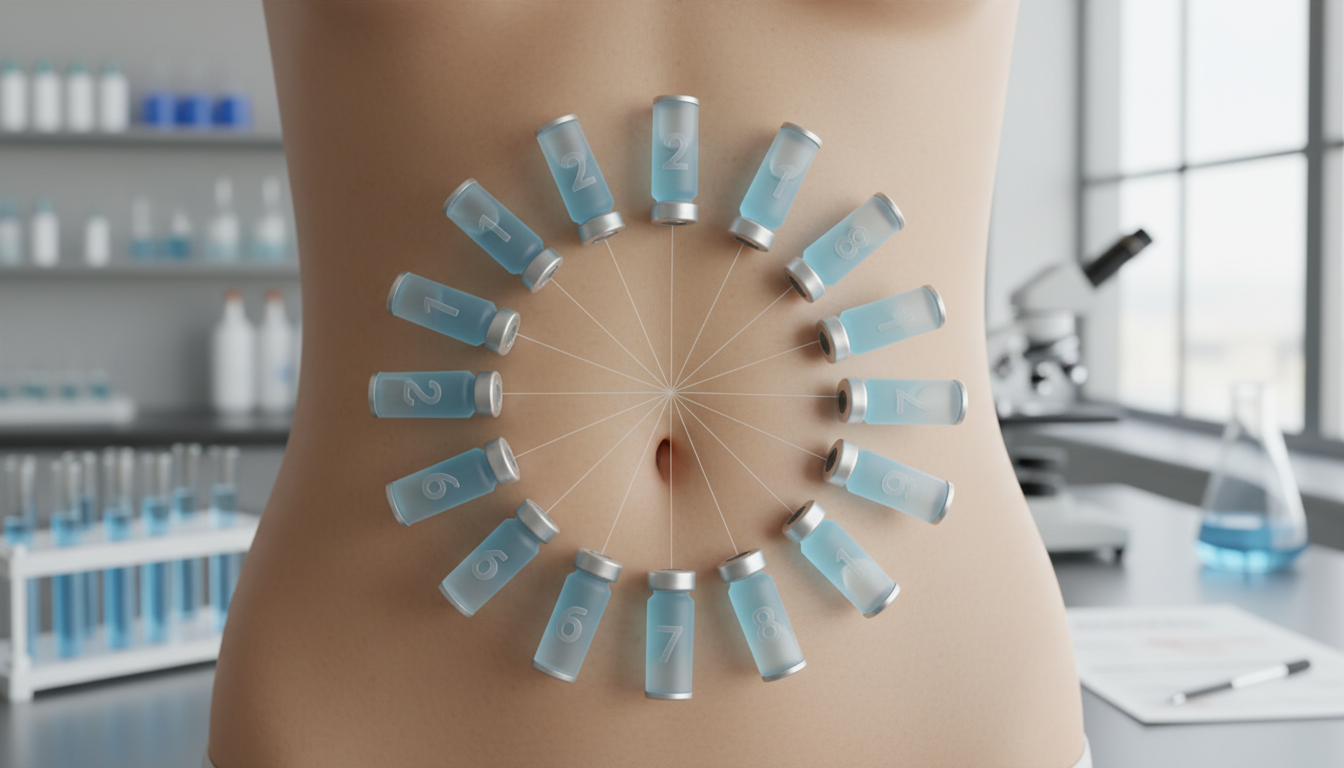
Not Rotating Injection Sites: This is the most common error. Injecting into the same spot every time can cause lipodystrophy. This is a condition where the fat tissue either breaks down (lipoatrophy, creating a dent) or builds up (lipohypertrophy, creating a lump). Both can interfere with medication absorption and change the skin's appearance (Peptide Dossier). Use a system to rotate sites. For daily injections, you can use the "clock method" on your abdomen, imagining it's a clock face and moving to the next number each day. For weekly injections (common for semaglutide and tirzepatide), alternate between the right and left side of your abdomen, thigh, or arm each week.
-
Injecting Too Close to the Navel: The tissue within two inches of your navel (belly button) is tougher and more fibrous. Peptides injected here may not absorb as consistently. Always maintain at least a two-inch (or 5 cm) buffer zone (Peptide Nerds).
-
Reusing Needles: Needles are designed for single use only. A used needle is no longer sterile and becomes dull, even after one injection. Reusing it increases the risk of infection, pain, and skin damage. Always use a new, sterile syringe for every single injection.
-
Injecting into Muscle (Intramuscularly): Unless specifically instructed by your doctor, peptides should be injected subcutaneously. Intramuscular (IM) injections are absorbed much faster and are reserved for specific compounds. Using an IM technique by mistake can alter the effects of your peptide and may be more painful. Using short, thin insulin needles (5/16" to 1/2") helps prevent this.
-
Shaking the Vial: Peptides are fragile protein chains. Vigorously shaking a vial, especially after reconstitution, can break these chains and render the medication ineffective. Always swirl or roll gently.
When to Contact Your Doctor
While self-administering peptide injections is generally very safe, you should always be in communication with your healthcare provider. Contact your doctor or a qualified peptide clinic if you experience any of the following:
- Signs of Infection: Redness, swelling, warmth, or pus at the injection site that worsens or doesn't go away after a day.
- Allergic Reaction: While rare, a severe allergic reaction (anaphylaxis) is a medical emergency. Symptoms include hives, swelling of the face, lips, or throat, and difficulty breathing.
- Persistent Lumps or Dents: If you notice hard lumps (lipohypertrophy) or significant dents (lipoatrophy) at your injection sites, show them to your provider. They can confirm the diagnosis and help you develop a better site rotation plan.
- Unexpected Side Effects: Many peptides have potential side effects. For example, GLP-1 agonists like semaglutide and tirzepatide can cause nausea or constipation. These medications also carry a boxed warning for a risk of thyroid C-cell tumors, and are contraindicated for people with a personal or family history of medullary thyroid carcinoma (MTC) or Multiple Endocrine Neoplasia syndrome type 2 (MEN 2) (WEGOVY Prescribing Information, ZEPBOUND Prescribing Information). Always discuss any new or concerning symptoms with your doctor.
- Questions About Your Dose: Never adjust your peptide dose on your own. If you think your dose needs to be changed, discuss it with your prescribing provider. For GLP-1s, they often use a specific semaglutide dosing chart to titrate you up safely.
Having a trusted peptide doctor is essential for a safe and successful treatment plan.
Ready to explore your options with a professional? Take our free 3-minute quiz to get matched with a licensed provider who can guide you through the process and determine the right treatment for you.
FAQs
What angle do you inject peptides?
For most subcutaneous peptide injections, you should insert the needle at a 90-degree angle (straight in) if you can pinch an inch or more of skin. If you are very lean, a 45-degree angle is recommended to ensure the needle enters the fat layer and not the underlying muscle.
Should you inject peptides fast or slow?
You should inject peptides slowly. Pushing the plunger down over 5-10 seconds is ideal. This minimizes pain or stinging and reduces the chance of the liquid leaking back out of the injection site.
Can you inject BPC-157 and TB-500 in the same spot?
While you can inject both peptides subcutaneously into a standard site like the abdomen, many practitioners suggest injecting them as close as possible to the site of injury for a potentially localized effect. However, you should not inject them at the exact same time in the same single spot. Use two separate injections, spaced at least an inch apart. For more details on these two, see our comparison of BPC-157 vs. TB-500.
What is the best place for peptide injections where to inject for weight loss?
For weight loss peptides like semaglutide and tirzepatide, the best injection sites are the abdomen, thigh, or upper arm. The abdomen is the most common and preferred site for its consistent and reliable absorption. The most important factor is to rotate your injection site each week to prevent skin issues.
Does it matter where you inject peptides?
Yes, it matters. Most peptides require a subcutaneous injection into the fatty tissue for proper absorption. Choosing an appropriate site like the abdomen, thigh, or arm and rotating between sites is critical for effectiveness and safety. Injecting into a muscle, scar, or too close to the navel can cause problems.
Contributing to evidence-based peptide education and provider transparency.
Too many clinics, not enough clarity?
We don't sell peptides. Tell us your goals and we'll connect you with a vetted provider who can figure out what actually makes sense for you.
See what's right for youRelated articles
How Protein and Muscle Growth Actually Work
It's not just about eating more. Understand the real science of protein and muscle growth to learn how much you need and the best timing to see results.
Peptide ScienceWhat are the best peptides for muscle growth and fat loss?
Exploring peptides for muscle growth and fat loss? Discover the most effective options for body recomposition, how they actually work, and what to expect.
Peptide ScienceThe Key L-Lysine Benefits for Skin, Immunity & Stress
Discover the science-backed l-lysine benefits. Our guide covers how this essential amino acid may boost collagen, fight viruses, and aid calcium absorption.